Multiplex Assay Design: A Practical Guide for Researchers
A well-designed multiplex assay starts with a Biomarker Work Plan (BWP), moves from optimized singleplex assays into progressively combined multiplex runs using in-silico screening and reagent balancing, and is validated against fit-for-purpose criteria defined before the first plate is run.
Before you touch a pipette, work through this checklist:
- Set a Biomarker Work Plan (BWP). Define per-analyte objectives, required sensitivity, matrix, and validation rigor upfront. This single document prevents wasted optimization cycles.
- Pick the right platform. Single-well qPCR or dPCR for nucleic acid targets; bead-based suspension arrays (Luminex), planar microarrays, or high-sensitivity platforms (Quanterix Simoa, Meso Scale Discovery) for protein panels.
- Run singleplex optimization first. Every assay in the panel must perform reliably alone before you combine it with others.
- Screen in silico. Use IDT OligoAnalyzer for hairpin and dimer checks and NCBI Primer-BLAST for specificity before ordering oligos.
- Combine progressively. Pairwise testing, then incremental plex expansion, then full-panel runs.
- Define acceptance criteria before validation begins. LOD/LLOQ, parallelism, QC pass/fail rules, and inter-lot bridging requirements all belong in the BWP, not in a post-hoc discussion.
The SmartPlexer workflow adds a data-driven layer to this: it uses singleplex amplification curves and distance metrics to rank primer combinations computationally, cutting the number of wet-lab screening experiments needed before you commit to a panel design.
Key Takeaways
Effective multiplex assay design requires a Biomarker Work Plan, singleplex-first optimization, in-silico screening, and fit-for-purpose validation criteria defined before bench work begins.
| Point | Details |
|---|---|
| Start with a BWP | Define per-analyte objectives, sensitivity, and validation rigor before any bench work begins. |
| Singleplex before multiplex | Every assay must pass efficiency, specificity, and LOD checks alone before pairwise combination testing. |
| In-silico screening is a filter | IDT OligoAnalyzer and NCBI Primer-BLAST eliminate the worst candidates; empirical testing is still required. |
| Fit-for-purpose validation | LOD/LLOQ, parallelism, freeze-thaw stability, and inter-lot bridging must be assessed per analyte, not just for the panel as a whole. |
| Mayflowerbio reagent alignment | AimPlex™ kits and HOT FIREPol® Multiplex qPCR Mix map directly to the bead-based immunoassay and PCR multiplex workflow steps in this guide. |
Table of Contents
- When should you choose multiplexing, and which platform fits your study?
- Primer and probe design rules every multiplex PCR panel needs
- Which in-silico tools actually reduce your wet-lab screening burden?
- How to move from singleplex optimization to a validated multiplex panel
- Validation and QC requirements for multiplex assays
- Design considerations specific to multiplex immunoassays
- Diagnosing and fixing the most common multiplex failures
- A practical project checklist and mini SOP for multiplex assay runs
- Mayflower Bioscience reagent recommendations mapped to the workflow
- Mayflowerbio accelerates your multiplex assay development
- Sources
- FAQ
When should you choose multiplexing, and which platform fits your study?
The decision to multiplex is not always obvious. Sample volume is usually the forcing function: when you have 50 µL of CSF or a pediatric blood draw, running 10 singleplex assays is simply not possible. But volume scarcity is only one driver. Target count, required quantitation accuracy, throughput, budget, and regulatory context all shape the right answer.
When multiplexing makes sense:
- Sample is limited and multiple analytes are needed from the same aliquot.
- Throughput demands exceed what singleplex plate capacity can support.
- Biomarker co-regulation means measuring analytes in the same reaction adds biological meaning (e.g., cytokine storm panels).
- A diagnostic syndromic panel requires simultaneous pathogen identification from a single swab.
When to stay singleplex (or split into subpanels):
- Targets require very different sample dilutions or matrix conditions.
- One analyte is at femtomolar concentrations while another is at nanomolar; a single calibration curve cannot serve both.
- Regulatory submission requires individual assay qualification with no shared-well compromise.
Platform tradeoffs at a glance
Digital and microfluidic multiplexing approaches have expanded what single-well and spatial formats can achieve, but the core tradeoffs between platforms remain consistent.
Advances in multiplex immunoassay platforms document that high-sensitivity systems like Simoa’s Planar Array increase plex and sensitivity substantially, but require expensive dedicated readers and careful spot morphology control to avoid cross-talk between adjacent capture zones.
For nucleic acid targets, QIAGEN’s dPCR reagents and guidance support absolute quantitation in low-plex panels where copy-number precision matters more than throughput. For protein biomarker panels in drug development, Luminex bead-based suspension arrays remain the workhorse because of their validated plex capacity and broad commercial kit availability.
One practical rule: if two targets in your panel require a 10-fold difference in sample dilution to fall within their respective dynamic ranges, split them into separate subpanels rather than forcing a compromise dilution that degrades one assay’s accuracy.
Primer and probe design rules every multiplex PCR panel needs
Getting primer and probe design right is where most multiplex PCR projects either succeed or stall. The core design constraints for multiplex qPCR are well established; the challenge is satisfying all of them simultaneously across every primer set in the panel.
Core design constraints
- Matched melting temperatures ™. All primers in the panel should have Tm values within 2–4°C of each other. A wider spread forces a thermal compromise that either reduces efficiency for high-Tm primers or increases non-specific amplification for low-Tm ones.
- Short amplicons. Keep amplicons under 200 bp where possible. Shorter products amplify more efficiently, tolerate partially degraded templates better, and reduce the chance of amplicon overlap between targets.
- GC content. Target 40–60% GC per primer. Primers outside this range are prone to secondary structures or low-efficiency binding.
- Primer length. 18–25 bases is the practical range. Shorter primers risk off-target binding; longer ones can form stable hairpins.
- Avoid 3’ complementarity. Even a 2–3 base overlap at the 3’ end between any two primers in the panel can generate primer dimers that consume reagents and generate false signal.
Probe design
Probe Tm should be 5–10°C above the primer Tm. This ensures the probe is fully hybridized before extension begins, which is critical for accurate signal generation in TaqMan-style assays.
Dye selection is where spectral separation becomes a real constraint. In a 4-plex panel, common dye combinations include FAM, HEX/VIC, ROX, and Cy5, but the actual separation depends on your instrument’s filter set. Always verify emission spectra against your specific reader’s optical configuration before committing to a dye scheme. Quencher choice matters too: dark quenchers (BHQ-1, BHQ-2) outperform TAMRA-based quenchers in multiplex reactions because they eliminate the TAMRA emission bleed that adds background across channels.
Concentration balancing
Dominant targets will outcompete weaker ones for polymerase and dNTPs. The fix is primer limiting: reduce the primer concentration for high-abundance targets (start at 50–100 nM instead of the standard 200–400 nM) and titrate upward for low-abundance targets. A matrix titration experiment, where you test 3–4 concentrations of each primer pair in a grid, is the most efficient way to find the right balance.
Pre-bench design checklist
- Design all primer sets using standard rules (Tm, GC%, length, amplicon size).
- Run each set through IDT OligoAnalyzer to check hairpin stability (ΔG) and homodimer/heterodimer formation. Flag any pair with ΔG more negative than approximately -9 kcal/mol.
- Submit all primers to NCBI Primer-BLAST for specificity screening against the target genome and any closely related sequences.
- Check all cross-primer pairs (every primer against every other primer in the panel) for heterodimer potential using OligoAnalyzer’s multi-sequence input.
- Confirm amplicon size ranges do not overlap if you plan to use melt-curve analysis for discrimination.
- Select probes and verify dye/quencher compatibility with your instrument.
- Order oligos only after all checks pass.
Multiplex PCR optimization research consistently shows that even after thorough in-silico design, empirical optimization remains necessary. Treat the checklist above as a filter that eliminates the worst candidates, not a guarantee of wet-lab performance.
Which in-silico tools actually reduce your wet-lab screening burden?
Computational screening before bench work is not optional in multiplex assay design. Done well, it cuts the number of primer combinations you need to test empirically by eliminating the ones thermodynamics already predicts will fail.
The essential tool set
IDT OligoAnalyzer is the standard starting point. It calculates Tm, hairpin stability, homodimer and heterodimer ΔG values, and self-complementarity. For a multiplex panel, the heterodimer check across all primer pairs is the most valuable function. Run every primer against every other primer in the panel, not just within each target’s pair.
NCBI Primer-BLAST handles specificity. It aligns your primer sequences against a selected database (human genome, viral reference sequences, or a custom FASTA) and flags off-target amplification sites. For diagnostic panels targeting pathogens, always run Primer-BLAST against both the pathogen genome and the host genome to catch primers that might amplify human background.
Thermodynamic free-energy packages such as the UNAFold/mfold suite or the Vienna RNA package extend the analysis to more complex secondary structures. These are most useful when you are designing probes for structured RNA targets or when OligoAnalyzer flags borderline hairpin values that need deeper evaluation.
SmartPlexer-style frameworks represent the most sophisticated layer. The SmartPlexer workflow integrates singleplex amplification curve data with a distance metric algorithm to rank which primer combinations are most likely to perform well together in a multiplex reaction. It was demonstrated on a 7-plex TaqMan assay and reduced the experimental screening burden substantially by identifying low-interference primer combinations computationally before any multiplex runs were attempted.
Stepwise in-silico workflow
- Single-assay checks. Run each primer/probe set individually through OligoAnalyzer and Primer-BLAST. Eliminate any set that fails specificity or shows strong self-structure.
- Cross-pairwise interaction matrix. Check every primer against every other primer in the panel for heterodimer formation. Build a matrix and flag any pair with ΔG below your threshold.
- Amplification curve analysis (ACA/MC). If you have singleplex curve data, apply SmartPlexer-style distance metrics to rank combinations. Machine-learning-enabled ACA/MC analysis can even allow same-channel multiplexing by classifying curve shapes, enabling higher plex in a single optical channel when paired with tailored chemistries.
- Simulated amplification checks. Some platforms (e.g., Primer3Plus with thermodynamic mode) allow simulated amplification to predict product yield under your specific salt and temperature conditions.
What in-silico tools cannot do
No bioinformatics tool perfectly predicts multiplex PCR performance. Software flags thermodynamic problems but cannot account for polymerase processivity under your specific mastermix conditions, template secondary structure in the actual sample matrix, or the competitive kinetics of multiple primer pairs fighting for the same enzyme pool. Treat computational results as a down-selection step and budget empirical screening time into your project timeline.
Archive everything. Keep a version-controlled record of every primer and probe sequence, the salt conditions used in thermodynamic calculations, the Primer-BLAST database version, and the OligoAnalyzer results. When a multiplex run fails six months later and you need to troubleshoot, this metadata is what tells you whether the problem is a sequence issue or a reagent issue.
How to move from singleplex optimization to a validated multiplex panel
The most reliable path from concept to working multiplex panel follows a strict sequence. Skipping steps to save time almost always costs more time later.
Step-by-step wet-lab workflow
-
Optimize each assay in singleplex. Run each primer/probe set alone with a dilution series of purified target. Confirm amplification efficiency (90–110%), specificity (single peak on melt curve or single band on gel), and sensitivity (LOD in the expected matrix). Do not proceed until every assay passes these criteria independently.
-
Generate singleplex standard curves. Establish a 5–7 point standard curve for each target. Record the slope, intercept, R², and efficiency. These become your reference benchmarks for detecting performance degradation when you combine assays.
-
Pairwise combination testing. Combine assays two at a time. For a 6-plex panel, this means testing 15 pairwise combinations. Check for efficiency drops, Cq shifts greater than 0.5 cycles, or new non-specific products. Any pair that shows interference goes back to primer redesign or concentration adjustment before you proceed.
-
Incremental plex expansion. Add one assay at a time to the best-performing pairwise combinations. At each step, recheck efficiency and Cq values against your singleplex benchmarks.
-
Full-panel optimization. Once all assays are combined, run a mastermix optimization matrix: test Mg²⁺ concentration (1.5–4.0 mM range), primer concentrations (titration matrix), and annealing temperature (gradient PCR across 55–65°C). A hot-start, multiplex-formulated mastermix like HOT FIREPol® Multiplex qPCR Mix reduces non-specific amplification during setup and is worth using from the pairwise testing stage onward.
-
Full-panel validation runs. Run the optimized panel with all controls in place: no-template control (NTC) for each channel, extraction controls, and a positive control for each target at two concentrations (high and low). Confirm that the NTC is clean and that positive controls hit expected Cq values within ±1 cycle.
Experimental layout and controls
For a well-organized PCR setup, place controls at fixed positions on every plate and document the plate map in your protocol. A minimum control set per run includes:
- NTC (one per fluorophore channel)
- Extraction/process control (to catch inhibition from the sample matrix)
- Positive control for each target at high and low concentration
- Inter-run calibrator (same lot, frozen aliquots) to track run-to-run drift
Mastermix and reagent considerations
Hot-start enzymes are not optional in multiplex PCR. Without them, non-specific extension during reaction setup generates primer dimers and background products that compete with your targets. Multiplex-formulated mixes are optimized for balanced amplification across multiple targets and typically contain adjusted polymerase concentrations, optimized buffer systems, and dNTP ratios that favor shorter amplicons.
Mg²⁺ concentration is the single most powerful tuning variable. Too low and efficiency drops; too high and non-specific products appear. For most multiplex reactions, 2.0–2.5 mM is a reasonable starting point, but the optimal value shifts when you change primer concentrations or add more targets.
Pushing forward with a compromised pair just buries the problem deeper in the panel.
Validation and QC requirements for multiplex assays
Validation for a multiplex panel is not a scaled-up version of singleplex validation. Each analyte in the panel needs its own acceptance criteria, and the panel as a whole needs additional tests that singleplex assays never require.
The fit-for-purpose validation framework for multiplex ligand binding assays is the most widely cited guidance for immunoassay panels in drug development. Its core principle applies equally to PCR panels: define what the assay needs to do for its specific study purpose, then validate to that standard, not to a universal gold-standard checklist that may be more stringent than the science requires.
Core validation components
LOD and LLOQ. Establish the limit of detection and the lower limit of quantitation for each analyte independently. In a multiplex panel, the LLOQ for one analyte may be constrained by the shared sample dilution, which is why dynamic range conflicts need to be resolved at the design stage.
Linearity and accuracy. Serial dilution of a known standard or spiked sample should produce a linear response across the working range.
Precision. Intra-run (within-plate) and inter-run (between-plate, between-day) precision should be assessed for each analyte.
Parallelism (for immunoassays). Serially diluted endogenous samples should produce a response curve parallel to the calibration curve. Failure of parallelism indicates matrix effects or antibody interference that can invalidate quantitation.
Freeze-thaw stability. Test each analyte through at least three freeze-thaw cycles in the intended matrix. Stability failures for individual analytes in a multiplex panel are common and may require matrix-specific handling protocols.
Inter-lot bridging. When reagent lots change mid-study, run a bridging experiment using in-house QC samples to confirm that the new lot produces equivalent results. Batch-to-batch variation is an under-appreciated source of artificial variability in multiplex studies; using the same kit lots across a study and producing in-house QCs to bridge lots reduces this risk substantially.
The Biomarker Work Plan
A Biomarker Work Plan (BWP) is not a regulatory requirement, but it is the most effective project governance tool available for multiplex assay development. It defines per-analyte objectives, the intended use of each measurement, the required sensitivity and precision, the matrix, and the validation rigor before any bench work begins. Teams that skip the BWP tend to discover mid-validation that two analytes in their panel have incompatible acceptance criteria, or that the study’s biological question requires a sensitivity the chosen platform cannot achieve. The BWP forces those conversations to happen at the planning stage, where they cost a meeting rather than a month of experiments.
QC strategy
For multiplex panels, a single multi-analyte QC pool that contains all panel targets at appropriate concentrations is more practical than separate QC materials per analyte, but it requires careful preparation and characterization.
Run-level acceptance rules should be defined in the BWP. Statistical alignment to biological variability is more defensible than applying a universal rule.
Design considerations specific to multiplex immunoassays
Protein-based multiplex panels introduce problems that nucleic acid multiplexing never encounters. Antibody cross-reactivity, calibration curve conflicts, and matrix effects are the three most common reasons a multiplex immunoassay panel fails to validate.
Platform formats and their tradeoffs
Planar microarrays capture multiple analytes on spatially distinct spots within a single well. The advantage is high plex capacity; the risk is spot morphology variability and cross-talk between adjacent capture zones when analyte concentrations are very different. MSD’s electrochemiluminescence platform uses a planar format with up to 10 spots per well and achieves a 5–6 log dynamic range per analyte, which reduces the dynamic range conflict problem that plagues other planar formats.
Suspension bead arrays (Luminex) use color-coded microspheres, each coated with a different capture antibody, read in a flow cytometer-style instrument. The bead-based multiplex assay format scales to hundreds of analytes per well and is the most flexible platform for custom panel development, but bead lot variation and carryover between beads are real sources of inter-run variability.
Quanterix Simoa achieves single-molecule sensitivity by confining individual immunocomplexes in femtoliter-volume arrays. It is the right choice when you need to measure analytes at sub-picogram-per-milliliter concentrations, but the workflow is more complex and the instrument cost is high.
Antibody selection and cross-reactivity
Every capture/detection antibody pair in a multiplex immunoassay panel must be screened for cross-reactivity against every other analyte in the panel. This is not a theoretical concern. Multiplex immunoassay cross-reactivity between structurally similar cytokines (e.g., IL-6 and IL-6 receptor, or members of the same protein family) is well documented and can produce false-positive signals that are indistinguishable from true analyte signal without careful controls.
The practical screen: spike each analyte individually at a high concentration into a matrix containing all other analytes at zero concentration, then measure all channels. Any channel that shows signal above background when its analyte is absent has a cross-reactivity problem that needs to be resolved before the panel can be used.
Blocking strategies matter too. Heterophilic antibodies in human serum can bridge capture and detection antibodies non-specifically, generating false signal. Including blocking reagents (e.g., heterophilic blocking tubes, animal serum) in the assay buffer reduces this background.
Calibration in shared conditions
A shared calibration curve in a multiplex immunoassay means all analytes are measured at the same sample dilution and in the same buffer conditions. When analytes span a wide concentration range, a single dilution cannot put all of them within their respective working ranges simultaneously. The solution is either to split the panel into concentration-matched subpanels or to use a surrogate matrix calibration approach where the calibrator is prepared in a matrix that mimics the sample without containing endogenous analyte.
Commercial multiplex kits can expedite analysis, but feasibility testing in the intended matrix is required before adoption. A kit validated in serum may not perform equivalently in CSF, synovial fluid, or cell culture supernatant without modification.
Diagnosing and fixing the most common multiplex failures
Most multiplex failures trace back to one of five root causes. Knowing which one you are dealing with before you start changing variables saves significant time.
Preferential amplification (PCR). One target dominates the reaction and suppresses others. Signs: Cq values for weaker targets shift later compared to singleplex benchmarks, or weaker targets drop out entirely at low template concentrations. Fix: reduce primer concentration for the dominant target in 50 nM steps; confirm the fix by checking that all Cq values return to within 0.5 cycles of their singleplex benchmarks.
Primer dimers. Visible as a late-Cq signal in NTC wells or a low-temperature melt peak. Fix: re-run OligoAnalyzer heterodimer checks for the specific primer pairs in the reaction; redesign the 3’ ends of the offending primers; switch to a hot-start mastermix if you have not already.
Spectral bleed (fluorophore crosstalk). Signal from one channel appears in an adjacent channel. This is an instrument calibration issue as much as a design issue. Fix: run a single-dye reference panel (one dye at a time, no template) to generate a spectral compensation matrix for your specific instrument. Most real-time PCR software has a multicomponent analysis function that corrects for bleed when properly calibrated.
High background in immunoassays. Elevated signal in negative controls or blank wells. Causes include non-specific antibody binding, heterophilic antibodies in the sample, or insufficient blocking. Run a spike-and-recovery experiment with each antibody pair individually to isolate which capture/detection pair is generating the background.
Inconsistent QC behavior across runs. QC values drift upward or downward over time without a corresponding change in sample results. This almost always indicates reagent degradation or lot change. Check reagent storage conditions, confirm lot numbers, and run a bridging experiment with the previous lot.
When to suspect matrix effects vs. design flaws:
- If the problem appears in all samples but not in buffer-based standards, suspect matrix effects. Run a serial dilution of a representative sample and check for parallelism with the standard curve.
- If the problem is reproducible in singleplex but not in multiplex, it is a design or concentration issue.
- If the problem is random across runs, suspect reagent stability or pipetting variability.
Quick decision tree:
- Cq shift or efficiency drop in multiplex vs. singleplex → rebalance primer concentrations or redesign the offending pair.
- NTC signal → primer dimer; redesign 3’ ends or reduce primer concentration.
- Channel bleed → recalibrate spectral compensation.
- Parallelism failure in immunoassay → matrix effect; test surrogate matrix or adjust dilution.
- Random run-to-run variability → reagent lot or stability issue; bridge lots with in-house QCs.
A practical project checklist and mini SOP for multiplex assay runs
Pre-study checklist
- [ ] BWP completed: per-analyte objectives, matrix, required sensitivity, and validation tier defined.
- [ ] Target list finalized: confirm all targets are detectable in the intended matrix at expected concentrations.
- [ ] Assay sourcing: commercial kits screened for feasibility in the study matrix, or custom assay design initiated.
- [ ] In-silico screening completed: OligoAnalyzer and Primer-BLAST checks passed for all primer/probe sets.
- [ ] Singleplex acceptance criteria defined: minimum efficiency, LOD, and Cq precision thresholds set before bench work begins.
- [ ] Controls and reagents ordered: NTC reagents, positive controls for each target, extraction controls, and QC materials.
- [ ] Plate map templates created: control positions fixed and documented.
- [ ] Reagent lot numbers recorded: all kit components, mastermix, and primers logged with lot numbers and expiration dates.
Mini SOP skeleton
Sample handling. Aliquot samples on ice; avoid repeated freeze-thaw cycles beyond the validated number. Record matrix type and storage conditions for each sample batch.
Reaction setup. Prepare mastermix on ice. Add primers and probes to mastermix before distributing to wells to minimize pipetting variability. Use a multichannel pipette or liquid handler for plates larger than 48 wells. For high-throughput drug screening workflows, automated liquid handling at this step reduces CV substantially.
Control placement. NTC wells in fixed positions (e.g., columns 11–12 for a 96-well plate). Positive controls at two concentrations per target. Extraction control in the same plate position every run.
Cycling conditions. Initial denaturation: 95°C for 10–15 minutes (hot-start activation). Cycling: 95°C for 15 seconds, annealing/extension at the optimized temperature (typically 60°C for most multiplex qPCR panels) for 60 seconds. 40–45 cycles. Melt curve analysis if using SYBR-based detection.
Run acceptance criteria. NTC: no amplification in any channel (or Cq > 40 for any late-appearing signal). Positive controls: Cq within ±1 cycle of established benchmarks. Extraction control: Cq within ±1 cycle of expected value. QC samples: within acceptance limits defined in the BWP.
Documentation. Record plate map, reagent lot numbers, cycling conditions, and instrument ID for every run. Version-control all primer and probe sequences in a shared repository with the salt conditions used for thermodynamic calculations. Archive raw amplification data and analysis files with run metadata.
Mayflower Bioscience reagent recommendations mapped to the workflow
Choosing the right reagents at each workflow stage reduces variability and shortens the path to a validated panel. Here is how specific Mayflower product lines map to the steps covered in this guide.
Reagent classes and workflow mapping
-
Multiplex qPCR mastermix. HOT FIREPol® Multiplex qPCR Mix is a hot-start, multiplex-formulated mix designed for balanced amplification across multiple targets. Use it from the pairwise testing stage onward to get performance data that reflects your final reaction conditions.
-
Bead-based immunoassay kits. AimPlex™ Multiplex Assays are bead-based suspension array kits for protein biomarker panels. They cover cytokine, chemokine, and growth factor panels and are compatible with Luminex-style readers. Feasibility testing in your specific matrix (serum, plasma, CSF) is still required before full validation, as the PMC guidance on multiplex LBA validation recommends.
-
Antibodies for custom immunoassay panels. When building a custom multiplex immunoassay rather than using a kit, Mayflowerbio’s antibody catalog covers research-grade capture and detection antibodies across multiple target classes. Pair selection and cross-reactivity screening should follow the antibody pairing workflow described in the immunoassay design section above.
-
Auxiliary PCR reagents. Mg²⁺ optimization and other reaction tuning reagents are available through Mayflowerbio’s PCR reagent lines, covering the supplemental components needed when standard mastermix conditions are not optimal for a specific panel.
Reducing reagent variability through lot management
Order enough of each reagent lot to cover the full study. Mid-study lot changes are one of the most common sources of unexplained QC drift in multiplex panels. When a lot change is unavoidable, run a bridging experiment using in-house QC samples prepared from the same pool: measure them with both the old and new lots and confirm that the results agree within your acceptance criteria before switching.
Pro Tip: Prepare in-house QC pools in large batches at the start of the study, aliquot into single-use volumes, and freeze at -80°C. These become your lot-bridging reference and your run-level acceptance anchor across the entire study, regardless of which commercial lot is in use.
For a broader view of how reagent selection affects assay performance across molecular biology workflows, Mayflowerbio’s overview of multiplex assay principles covers the foundational concepts that underpin the design decisions in this guide.
What multiplex projects actually teach you
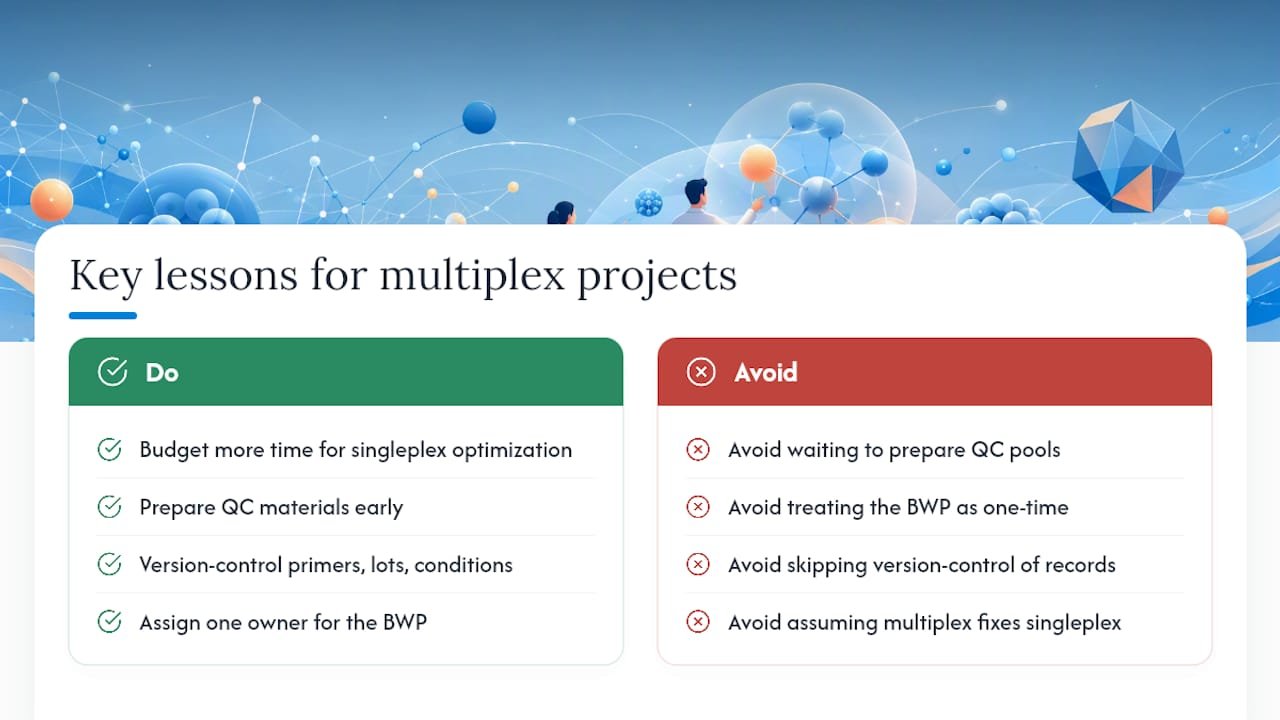
The lesson that surprises labs most consistently is how much time the singleplex optimization phase takes relative to the multiplex combination phase. Teams that budget two weeks for singleplex and six weeks for multiplex almost always end up inverting that ratio. Singleplex optimization is where the real design work happens. If an assay is not clean and efficient alone, it will not become clean and efficient in a panel.
The second lesson: invest in QC materials early, before you think you need them. Labs that wait until the validation phase to prepare in-house QC pools often discover that the biological matrix they planned to use has changed (a new serum lot, a different cell line passage), and they have no historical anchor to compare against. Preparing QC pools from a well-characterized matrix at the start of the project costs one afternoon and saves weeks of troubleshooting later.
Documentation is the third underestimated factor. Version-controlling primer sequences, reagent lots, and cycling conditions from day one means that when a run fails three months into a study, you can trace the change that caused it. Without that record, troubleshooting becomes archaeology.
For team organization: assign one person to own the BWP and keep it current as the project evolves. The BWP is a living document, not a one-time deliverable. When a target gets dropped or an acceptance criterion gets revised, that change belongs in the BWP with a date and a rationale, not just in someone’s notebook.
Mayflowerbio accelerates your multiplex assay development
Researchers who have worked through this guide know that the bottlenecks in multiplex assay development are rarely conceptual. They are practical: finding a mastermix that balances amplification across six targets, sourcing antibody pairs that do not cross-react, managing reagent lots across a 12-month study. Mayflowerbio’s product lines are built around exactly those friction points.

The AimPlex™ bead-based multiplex assay kits cover cytokine and growth factor panels out of the box, with technical documentation that maps directly to the fit-for-purpose validation steps described in this guide. For PCR panels, HOT FIREPol® Multiplex qPCR Mix delivers the hot-start, multiplex-optimized chemistry that makes pairwise testing and full-panel runs reproducible from the first plate. Paired with Mayflowerbio’s antibody catalog and auxiliary PCR reagents, you have the core components for both immunoassay and nucleic acid multiplex panels from a single US-based supplier, with lot-level traceability and technical support.
Ready to move your panel from design to validated runs? Browse Mayflowerbio’s multiplex assay and reagent catalog or contact the technical team directly to discuss reagent selection for your specific panel and matrix.
Sources
The following sources back the key claims in this guide and are worth reading in full for deeper coverage of specific workflow stages.
- Smart-Plexer: a breakthrough workflow for hybrid development of multiplex PCR assays – PMC – NIH
- Designing multiplex qPCR assays
- Next-generation molecular diagnostics: Leveraging digital technologies to enhance multiplexing in real-time PCR – ScienceDirect
This article is general information, not a substitute for advice from a qualified doctor. Consult a qualified healthcare professional about your own circumstances before acting on anything here.
FAQ
What is a multiplex assay?
A multiplex assay measures multiple analytes simultaneously in a single reaction or well, using distinguishable signals (fluorophore channels, bead codes, or spatial positions) to assign each measurement to its target. Common formats include multiplex qPCR panels for nucleic acid targets and bead-based or planar immunoassay panels for proteins.
What is the difference between a singleplex and a multiplex assay?
A singleplex assay measures one target per reaction; a multiplex assay measures two or more targets in the same reaction simultaneously. Multiplex assays conserve sample and increase throughput but require additional design and validation steps, including cross-reactivity testing and per-analyte acceptance criteria.
How do you design a multiplex qPCR panel?
Match primer Tm values within 2–4°C across all sets, keep amplicons under 200 bp, screen all primer pairs for heterodimer formation using IDT OligoAnalyzer, confirm specificity with NCBI Primer-BLAST, optimize each assay in singleplex first, then combine progressively with pairwise testing before full-panel runs.
What are the most common problems with multiplex PCR?
Preferential amplification (one target suppresses others), primer dimer formation, and spectral bleed between fluorophore channels are the three most frequent failures. Empirical optimization, including primer concentration titration and hot-start mastermix use, is required even after thorough in-silico design.
When should you split a multiplex panel into subpanels?
Split the panel when two or more analytes require significantly different sample dilutions to fall within their working ranges, when targets have incompatible assay buffer requirements, or when cross-reactivity between antibody pairs cannot be resolved through blocking strategies alone.